# ssm - mybatis-plus
# 1. MyBatisPlus 入门案例与简介
# 1.1. MybatisPlus 简介
MyBatisPlus(简称 MP)是基于 MyBatis 框架基础上开发的增强型工具,旨在 简化开发、提高效率
MyBatisPlus的官网为: https://mp.baomidou.com/
# 1.2. MybatisPlus 入门案例
建表:
create database if not exists mybatisplus_db;

use mybatisplus_db;

CREATE TABLE user (
    id bigint(20) primary key auto_increment,
    name varchar(32) not null,
    password  varchar(32) not null,
    age int(3) not null ,
    tel varchar(32) not null
);

insert into user values(1,'Tom','tom',3,'18866668888');
insert into user values(2,'Jerry','jerry',4,'16688886666');
insert into user values(3,'Jock','123456',41,'18812345678');
insert into user values(4,'传智播客','itcast',15,'4006184000');
pom.xml:
<?xml version="1.0" encoding="UTF-8"?>
<project xmlns="http://maven.apache.org/POM/4.0.0" xmlns:xsi="http://www.w3.org/2001/XMLSchema-instance"
         xsi:schemaLocation="http://maven.apache.org/POM/4.0.0 https://maven.apache.org/xsd/maven-4.0.0.xsd">
    <modelVersion>4.0.0</modelVersion>
    <groupId>org.example</groupId>
    <artifactId>mybatis-plus-01-quickstart</artifactId>
    <version>0.0.1-SNAPSHOT</version>

    <parent>
        <groupId>org.springframework.boot</groupId>
        <artifactId>spring-boot-starter-parent</artifactId>
        <version>2.5.0</version>
    </parent>

    <!--JDK 的版本-->
    <properties>
        <java.version>8</java.version>
    </properties>

    <dependencies>
        <dependency>
            <groupId>org.springframework.boot</groupId>
            <artifactId>spring-boot-starter</artifactId>
        </dependency>

        <dependency>
            <groupId>mysql</groupId>
            <artifactId>mysql-connector-java</artifactId>
            <scope>runtime</scope>
        </dependency>

        <dependency>
            <groupId>com.baomidou</groupId>
            <artifactId>mybatis-plus-boot-starter</artifactId>
            <version>3.4.1</version>
        </dependency>

        <dependency>
            <groupId>com.alibaba</groupId>
            <artifactId>druid</artifactId>
            <version>1.1.16</version>
        </dependency>

        <dependency>
            <groupId>org.springframework.boot</groupId>
            <artifactId>spring-boot-starter-test</artifactId>
            <scope>test</scope>
        </dependency>
    </dependencies>

    <build>
        <plugins>
            <plugin>
                <groupId>org.springframework.boot</groupId>
                <artifactId>spring-boot-maven-plugin</artifactId>
            </plugin>
        </plugins>
    </build>

</project>
application.yml:
spring:
  datasource:
    type: com.alibaba.druid.pool.DruidDataSource
    driver-class-name: com.mysql.cj.jdbc.Driver
    url: jdbc:mysql://localhost:3306/mybatisplus_db?serverTimezone=UTC
    username: root
    password: 123456
domain 和 dao:
package org.example.domain;
public class User {
    private Long id;
    private String name;
    private String password;
    private Integer age;
    private String tel;
    // ...
}


package org.example.dao;
@Mapper
public interface UserDao extends BaseMapper<User> {
}
测试:
@SpringBootTest
class MybatisPlus01QuickstartApplicationTests {
    @Autowired
    private UserDao userDao;

    @Test
    public void testGetAll() {
        List<User> userList = userDao.selectList(null);
        userList.forEach(System.out::println);
    }
}
# 2. 标准数据层开发
# 2.1. 标准 CRUD 使用
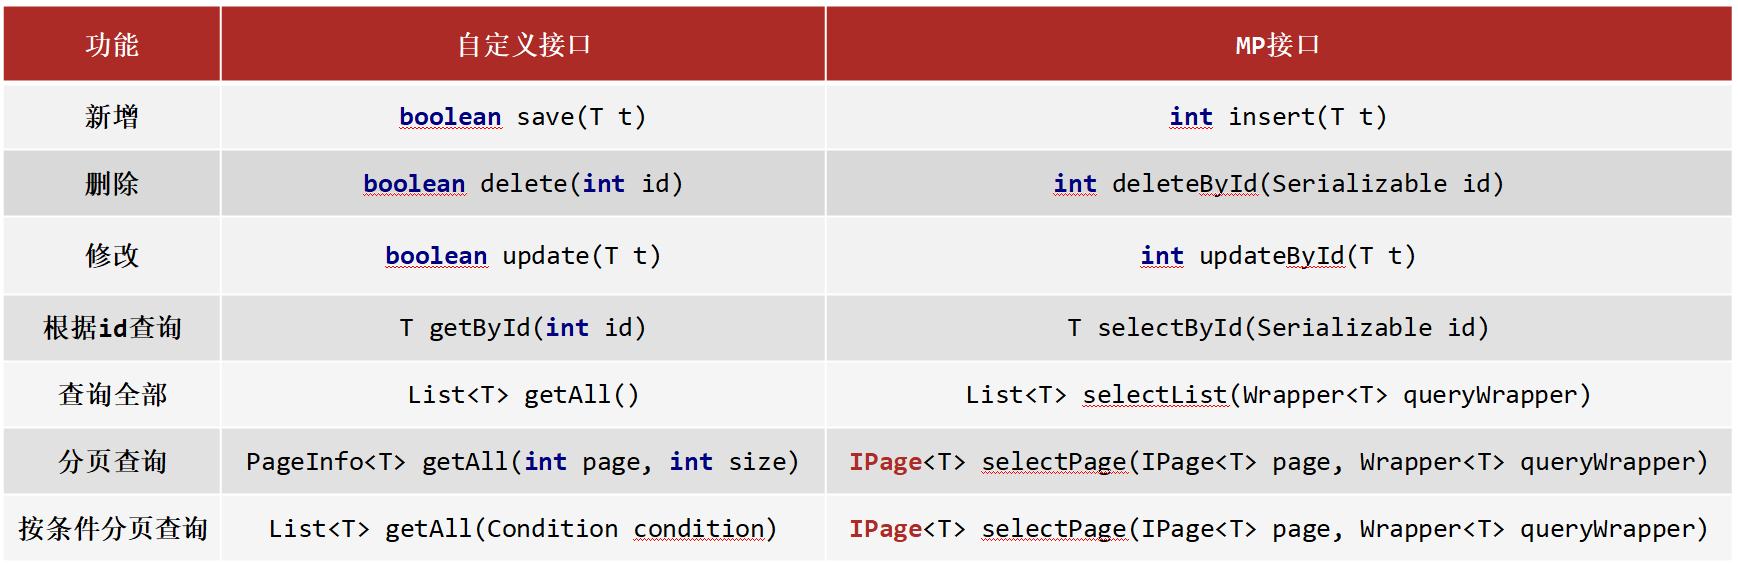
# 2.2. 新增
方法:
int insert (T t)
说明:
- 返回值,新增成功后返回
1,没有新增成功返回的是0
# 2.3. 删除
方法:
int deleteById (Serializable id)
说明:
String和Number是Serializable的子类Number又是Float,Double,Integer等类的父类- MP 使用
Serializable作为参数类型,就好比我们可以用Object接收任何数据类型一样。 - 返回值类型,数据删除成功返回
1,未删除数据返回0
# 2.4. 修改
方法:
int updateById(T t);
说明:
- 因为是根据ID进行修改,所以传入的对象中需要有ID属性值
- 非全量修改,只修改实体对象中非 null 的属性
- 返回值类型,数据删除成功返回
1,未删除数据返回0
# 2.5. 根据 ID 查询
方法:
T selectById (Serializable id)
# 2.6. 查询所有
方法:
List<T> selectList(Wrapper<T> queryWrapper)
说明:
Wrapper: 用来构建条件查询的条件,目前我们没有可直接传为nullList<T>: 因为查询的是所有,所以返回的数据是一个集合
# 2.7. Lombok
说明:
- Lombok ,一个 Java 类库,提供了一组注解,简化 POJO 实体类开发。
坐标:
<dependency>
    <groupId>org.projectlombok</groupId>
    <artifactId>lombok</artifactId>
    <!-- 版本可以不用写,因为 SpringBoot 中已经管理了 lombok的版本。 -->
    <!-- <version>1.18.12</version> -->
</dependency>
Lombok 常见的注解有:
@NoArgsConstructor: 提供一个无参构造函数@AllArgsConstructor: 提供一个包含所有参数的构造函数@Data: 是个组合注解,包含如下注解的功能@Setter: 为模型类的属性提供 setter 方法@Getter: 为模型类的属性提供 getter 方法@ToString: 为模型类的属性提供 toString 方法@EqualsAndHashCode: 为模型类的属性提供 equal s和 hashcode 方法
# 2.8. 分页功能
方法:
IPage<T> selectPage(IPage<T> page, Wrapper<T> queryWrapper)
说明:
IPage: 用来构建分页查询条件Wrapper: 用来构建条件查询的条件,目前我们没有可直接传为 nullIPage: 返回值,你会发现构建分页条件和方法的返回值都是IPage
示例:
//分页查询
@Test
void testSelectPage(){
    //1 创建IPage分页对象,设置分页参数,1为当前页码,3为每页显示的记录数
    // 页码从 1 开始,而非从 0 开始
    IPage<User> page=new Page<>(1,3);
    //2 执行分页查询
    userDao.selectPage(page,null);
    //3 获取分页结果
    System.out.println("当前页码值:"+page.getCurrent());
    System.out.println("每页显示数:"+page.getSize());
    System.out.println("一共多少页:"+page.getPages());
    System.out.println("一共多少条数据:"+page.getTotal());

    System.out.println("数据:");
    page.getRecords().forEach(System.out::println);
}
# 2.8.1. 开启分页功能
(1) 设置分页拦截器
package org.example.config;

@Configuration
public class MybatisPlusConfig {
    @Bean
    public MybatisPlusInterceptor mybatisPlusInterceptor(){
        //1 创建MybatisPlusInterceptor拦截器对象
        MybatisPlusInterceptor mpInterceptor=new MybatisPlusInterceptor();
        //2 添加分页拦截器
        mpInterceptor.addInnerInterceptor(new PaginationInnerInterceptor());
        return mpInterceptor;
    }
}
(2) 打开日志(可选)
mybatis-plus:
  configuration:
    # 打印SQL日志到控制台
    log-impl: org.apache.ibatis.logging.stdout.StdOutImpl
# 3. DQL 编程控制
内容:
- 条件查询方式
- 查询投影
- 查询条件设定
- 字段映射与表名映射
# 3.1. 条件查询
# 3.1.1. 构建条件查询
示例:
// 方式 1: QueryWrapper
QueryWrapper<User> qw = new QueryWrapper<>();

qw.lt("age",18);

List<User> userList = userDao.selectList(qw);


// 方式 2: QueryWrapper + lambda
QueryWrapper<User> qw = new QueryWrapper<>();

qw.lambda().lt(User::getAge,18);

List<User> userList = userDao.selectList(qw);


// 方式 3: LambdaQueryWrapper
LambdaQueryWrapper<User> lqw = new LambdaQueryWrapper<>();

lqw.lt(User::getAge,18);

List<User> userList = userDao.selectList(lqw);
# 3.1.2. 关闭 SpringBoot、MybatisPlus 的启动 banner
application.yml:
spring:
  datasource:
    type: com.alibaba.druid.pool.DruidDataSource
    driver-class-name: com.mysql.cj.jdbc.Driver
    url: jdbc:mysql://localhost:3306/mybatisplus_db?serverTimezone=UTC
    username: root
    password: 123456
  main:
    # 关闭 SpringBoot 的启动 banner
    banner-mode: off


mybatis-plus:
  configuration:
    # 打印SQL日志到控制台
    log-impl: org.apache.ibatis.logging.stdout.StdOutImpl
  global-config:
    # 关闭 MybatisPlus 的启动 banner
    banner: false
# 3.1.3. 取消初始化 spring 日志打印
resources/logback.xml:
<?xml version="1.0" encoding="UTF-8"?>
<configuration>
</configuration>
# 3.1.4. 多条件构建
LambdaQueryWrapper<User> lqw = new LambdaQueryWrapper<>();

// and
// WHERE (age > ? AND age < ?)
lqw.gt(User::getAge,18).lt(User::getAge, 60);

// or
// WHERE (age < ? OR age > ?)
lqw.lt(User::getAge,18).or().gt(User::getAge, 60);

List<User> userList = userDao.selectList(lqw);
# 3.1.5. 条件查询 null 值判定
满足条件才拼接语句:
package org.example.domain.query;
@Data
public class UserQuery extends User { // 专门用于封装前端传过来的条件
    private Integer minAge;
    private Integer maxAge;
}

LambdaQueryWrapper<User> lqw = new LambdaQueryWrapper<>();

UserQuery userQuery = new UserQuery();
userQuery.setMinAge(18);
userQuery.setMaxAge(60);

lqw.gt(userQuery.getMinAge() != null, User::getAge, userQuery.getMinAge());
lqw.lt(userQuery.getMaxAge() != null, User::getAge, userQuery.getMaxAge());

List<User> userList = userDao.selectList(lqw);
# 3.2. 查询投影
(1) 只查询部分字段的数据,未指定的字段为 null:
方式1:
QueryWrapper<User> qw = new QueryWrapper<>();

// SELECT id,name FROM user
qw.select("id", "name");

List<User> userList = userDao.selectList(qw);
System.out.println(userList);
方式2:
LambdaQueryWrapper<User> lqw = new LambdaQueryWrapper<>();

// SELECT id,name FROM user
lqw.select(User::getId, User::getName);

List<User> userList = userDao.selectList(lqw);
System.out.println(userList);
(2) 指定别名:
QueryWrapper<User> qw = new QueryWrapper<>();

qw.select("count(*) as count");

List<Map<String, Object>> maps = userDao.selectMaps(qw);
System.out.println(maps); // [{count=4}]
# 3.3. 查询条件
等值查询:
- eq(): 相当于
=
范围查询:
- gt(): 大于(>)
- ge(): 大于等于(>=)
- lt(): 小于(<)
- lte(): 小于等于(<=)
- between(): between ? and ?
模糊查询:
- like(): 前后加百分号,如 %J%
- likeLeft(): 前面加百分号,如 %J
- likeRight(): 后面加百分号,如 J%
排序查询:
- groupBy(boolean condition, R... columns)
- orderByAsc(boolean condition, R... columns)
- orderByDesc(boolean condition, R... columns)
参考:
# 3.4. 映射匹配兼容性
问题:
- 表字段与编码属性设计不同步
- 编码中添加了数据库中未定义的属性
- 采用默认查询开放了更多的字段查看权限
示例:
@Data

// 表名映射: 类名 -> 表名
@TableName("user")
public class UnMatchedUser {
    // 字段映射: 属性名 -> 字段名
    @TableField("id")
    private Long userId;

    private String name;

    // 该字段不在 select 字段列表中,也就是说查询时不查询该字段
    @TableField(select = false)
    private String password;

    private Integer age;
    private String tel;

    // 该字段不存在数据库表
    @TableField(exist = false)
    private Boolean online;
}
知识点 1: @TableField
| 名称 | @TableField |
|---|---|
| 类型 | 属性注解 |
| 位置 | 模型类属性定义上方 |
| 作用 | 设置当前属性对应的数据库表中的字段关系 |
| 相关属性 | value(默认):设置数据库表字段名称 exist:设置属性在数据库表字段中是否存在,默认为 true,此属性不能与 value 合并使用 select:设置属性是否参与查询,此属性与select()映射配置不冲突 |
知识点2: @TableName
| 名称 | @TableName |
|---|---|
| 类型 | 类注解 |
| 位置 | 模型类定义上方 |
| 作用 | 设置当前类对应于数据库表关系 |
| 相关属性 | value(默认):设置数据库表名称 |
# 4. DML编程控制
# 4.1. id 生成策略控制
新增时,ID自动生成策略
通过 @TableId 指定 主键属性 的 ID 生成策略
| 名称 | @TableId |
|---|---|
| 类型 | 属性注解 |
| 位置 | 模型类中用于表示主键的属性定义上方 |
| 作用 | 设置当前类中主键属性的生成策略 |
| 相关属性 | value(默认):设置数据库表主键名称 type:设置主键属性的生成策略,值查照 IdType 的枚举值 |
示例:
@Data
@TableName("tbl_user")
public class User {
    // NONE: 不设置id生成策略
    @TableId(type = IdType.NONE)
    private Long id;

    // ID 自增长。需要在数据库对应配置自增长
    @TableId(type = IdType.AUTO)
    private Long id;


    // 手动输入。
    @TableId(type = IdType.INPUT)
    private Long id;


    // 自动生成 64 位长整型数字或字符串。(通过雪花算法)
    @TableId(type = IdType.ASSIGN_ID)
    private Long id;


    // UUID
    @TableId(type = IdType.ASSIGN_UUID)
    private String id;
}
# 4.1.1. 雪花算法
- SnowFlake
- 是 Twitter 官方给出的算法实现 是用 Scala写的。其生成的结果是一个 64bit 大小整数,它的结构如下图:
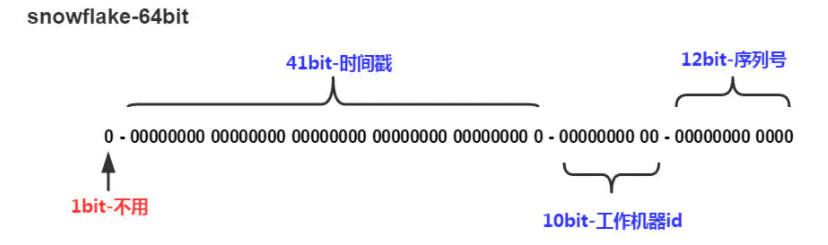
- 1bit,不用,因为二进制中最高位是符号位,1表示负数,0表示正数。生成的id一般都是用整数,所以最高位固定为0。
- 41bit-时间戳,用来记录时间戳,毫秒级
- 10bit-工作机器id,用来记录工作机器id,其中高位5bit是数据中心ID其取值范围0-31,低位5bit是工作节点ID其取值范围0-31,两个组合起来最多可以容纳1024个节点
- 序列号占用12bit,每个节点每毫秒0开始不断累加,最多可以累加到4095,一共可以产生4096个ID
# 4.1.2. ID 生成策略对比
介绍了这些主键ID的生成策略,我们以后该用哪个呢?
- NONE: 不设置id生成策略,MP不自动生成,约等于INPUT,所以这两种方式都需要用户手动设置,但是手动设置第一个问题是容易出现相同的ID造成主键冲突,为了保证主键不冲突就需要做很多判定,实现起来比较复杂
- AUTO:数据库ID自增,这种策略适合在数据库服务器只有1台的情况下使用,不可作为分布式ID使用
- ASSIGN_UUID:可以在分布式的情况下使用,而且能够保证唯一,但是生成的主键是32位的字符串,长度过长占用空间而且还不能排序,查询性能也慢
- ASSIGN_ID:可以在分布式的情况下使用,生成的是Long类型的数字,可以排序性能也高,但是生成的策略和服务器时间有关,如果修改了系统时间就有可能导致出现重复主键
- 综上所述,每一种主键策略都有自己的优缺点,根据自己项目业务的实际情况来选择使用才是最明智的选择。
# 4.1.3. 简化配置
给每个模型类的主键设置默认的 ID 生成策略:
mybatis-plus:
  global-config:
    db-config:
    	id-type: assign_id
MP 会默认将模型类的类名名首字母小写作为表名使用,假如数据库表的名称都以 tbl_ 开头,则可以统一设置前缀
mybatis-plus:
  global-config:
    db-config:
    	table-prefix: tbl_
# 4.2. 多记录操作
// 按照id集合批量删除
int deleteBatchIds(@Param(Constants.COLLECTION) Collection<? extends Serializable> idList);

// 按照id集合批量查找
List<T> selectBatchIds(@Param(Constants.COLLECTION) Collection<? extends Serializable> idList);
# 4.3. 逻辑删除
一旦存在逻辑删除字段,则 删除SQL 变为 修改SQL,且查询SQL都会带上 delete = 0 的条件
# 4.3.1. 步骤
(1) 在表中添加 deleted 列
`deleted` tinyint(1) NULL DEFAULT 0,
(2) 使用 @TableLogic 标记删除字段
@Data
public class User {
    //...


    // value 为正常数据的值,delval 为删除数据的值
    @TableLogic(value="0",delval="1")
    private Integer deleted;
}
| 名称 | @TableLogic |
|---|---|
| 类型 | 属性注解 |
| 位置 | 模型类中用于表示删除字段的属性定义上方 |
| 作用 | 标识该字段为进行逻辑删除的字段 |
| 相关属性 | value:逻辑未删除值 delval:逻辑删除值 |
# 4.3.2. 全局配置删除字段
mybatis-plus:
  global-config:
    db-config:
      # 逻辑删除字段名
      logic-delete-field: deleted

      # 逻辑删除字面值:未删除为0
      logic-not-delete-value: 0

      # 逻辑删除字面值:删除为1
      logic-delete-value: 1
配置完后,如果 模型类中存在 deleted 字段,都会应用逻辑删除
# 4.4. 乐观锁
# 4.4.1. 概念
业务并发现象带来的问题: 秒杀
- 假如有100个商品或者票在出售,为了能保证每个商品或者票只能被一个人购买,如何保证不会出现超买或者重复卖
- 对于这一类问题,其实有很多的解决方案可以使用
- 第一个最先想到的就是锁,锁在一台服务器中是可以解决的,但是如果在多台服务器下锁就没有办法控制,比如12306有两台服务器在进行卖票,在两台服务器上都添加锁的话,那也有可能会导致在同一时刻有两个线程在进行卖票,还是会出现并发问题
- 我们接下来介绍的这种方式是针对于小型企业的解决方案,因为数据库本身的性能就是个瓶颈,如果对其并发量超过 2000 以上的就需要考虑其他的解决方案了。
比如说,用户管理,多个管理员同时编辑某个用户的信息,拿到的都是相同的用户信息,都保存的情况下,是以哪个的为准?
简单来说,乐观锁主要解决的问题是当要更新一条记录的时候,希望这条记录没有被别人更新。
# 4.4.2. 实现思路
乐观锁的实现方式:
- 数据库表中添加 version 列,比如默认值给 1
- 第一个线程要修改数据之前,取出记录时,获取当前数据库中的 version=1
- 第二个线程要修改数据之前,取出记录时,获取当前数据库中的 version=1
- 第一个线程执行更新时,
set version = newVersion where version = oldVersion- newVersion = version + 1 (2)
- oldVersion = version (1)
- 第二个线程执行更新时,
set version = newVersion where version = oldVersion- newVersion = version + 1 (2)
- oldVersion = version (1)
- 假如这两个线程都来更新数据,第一个和第二个线程都可能先执行
- 假如第一个线程先执行更新,会把 version 改为 2
- 第二个线程再更新的时候,
set version = 2 where version = 1, 此时数据库表的数据 version 已经为 2,所以第二个线程会修改失败 - 不管谁先执行都会确保只能有一个线程更新数据,这就是 MP 提供的乐观锁的实现原理分析
# 4.4.3. 实现步骤
表中添加 version 列:
`version` int NULL DEFAULT 1,
用 @Version 在模型类中标记 version 属性:
@Data
public class User {
    // ...


    @Version
    private Integer version;
}
添加乐观锁的拦截器:
package org.example.config;

@Configuration
public class MybatisPlusConfig {
    @Bean
    public MybatisPlusInterceptor mybatisPlusInterceptor(){
        //1 创建MybatisPlusInterceptor拦截器对象
        MybatisPlusInterceptor mpInterceptor=new MybatisPlusInterceptor();
        //2 添加分页拦截器
        mpInterceptor.addInnerInterceptor(new PaginationInnerInterceptor());
        //3.添加乐观锁拦截器
        mpInterceptor.addInnerInterceptor(new OptimisticLockerInnerInterceptor());
        return mpInterceptor;
    }
}
执行更新操作:
// 1. 先通过 id 查询出数据
User user = userDao.selectById(1L);     // version = 1
User user2 = userDao.selectById(1L);    // version = 1

user.setName("Tom 1111");
user2.setName("Tom 2222");

// 2. 携带 version 条件,进行修改
userDao.updateById(user);               // where version = 1
userDao.updateById(user2);              // where version = 1 不成立,更新失败
# 5. 代码生成器
坐标:
<!--代码生成器-->
<dependency>
    <groupId>com.baomidou</groupId>
    <artifactId>mybatis-plus-generator</artifactId>
    <version>3.4.1</version>
</dependency>

<!--velocity模板引擎-->
<dependency>
    <groupId>org.apache.velocity</groupId>
    <artifactId>velocity-engine-core</artifactId>
    <version>2.3</version>
</dependency>
代码:
package generator;

import com.baomidou.mybatisplus.annotation.IdType;
import com.baomidou.mybatisplus.generator.AutoGenerator;
import com.baomidou.mybatisplus.generator.config.DataSourceConfig;
import com.baomidou.mybatisplus.generator.config.GlobalConfig;
import com.baomidou.mybatisplus.generator.config.PackageConfig;
import com.baomidou.mybatisplus.generator.config.StrategyConfig;

public class CodeGenerator {
    public static void main(String[] args) {
        //1.获取代码生成器的对象
        AutoGenerator autoGenerator = new AutoGenerator();

        //设置数据库相关配置
        DataSourceConfig dataSource = new DataSourceConfig();
        dataSource.setDriverName("com.mysql.cj.jdbc.Driver");
        dataSource.setUrl("jdbc:mysql://localhost:3306/mybatisplus_db?serverTimezone=UTC");
        dataSource.setUsername("root");
        dataSource.setPassword("123456");
        autoGenerator.setDataSource(dataSource);

        //设置全局配置
        GlobalConfig globalConfig = new GlobalConfig();
        globalConfig.setOutputDir(System.getProperty("user.dir")+"/../mybatis-plus-02-generator/src/main/java");    //设置代码生成位置
        globalConfig.setOpen(false);    //设置生成完毕后是否打开生成代码所在的目录
        globalConfig.setAuthor("黑马程序员");    //设置作者
        globalConfig.setFileOverride(true);     //设置是否覆盖原始生成的文件
        globalConfig.setMapperName("%sDao");    //设置数据层接口名,%s为占位符,指代模块名称
        globalConfig.setIdType(IdType.ASSIGN_ID);   //设置Id生成策略
        autoGenerator.setGlobalConfig(globalConfig);

        //设置包名相关配置
        PackageConfig packageInfo = new PackageConfig();
        packageInfo.setParent("org.example.user");   //设置生成的包名,与代码所在位置不冲突,二者叠加组成完整路径
        packageInfo.setEntity("entity");    //设置实体类包名
        packageInfo.setMapper("dao");   //设置数据层包名
        autoGenerator.setPackageInfo(packageInfo);

        //策略设置
        StrategyConfig strategyConfig = new StrategyConfig();
        strategyConfig.setInclude("user");  //设置当前参与生成的表名,参数为可变参数
        // strategyConfig.setTablePrefix("tbl_");  //设置数据库表的前缀名称,模块名 = 数据库表名 - 前缀名  例如: User = tbl_user - tbl_
        strategyConfig.setRestControllerStyle(true);    //设置是否启用Rest风格
        strategyConfig.setVersionFieldName("version");  //设置乐观锁字段名
        strategyConfig.setLogicDeleteFieldName("deleted");  //设置逻辑删除字段名
        strategyConfig.setEntityLombokModel(true);  //设置是否启用lombok
        autoGenerator.setStrategy(strategyConfig);
        //2.执行生成操作
        autoGenerator.execute();
   }
}
上一篇: 下一篇: